When you’re ready to have your book printed with CreateSpace and you’re planning on tackling the cover on your own it can seem rather daunting. It certainly terrified me to begin with and I only very recently updated my covers from the originals I made using the CreateSpace online cover creator. There’s nothing wrong with using that though. It depends on you entirely. Today I’ll show you how to make a PDF cover using their downloadable template. Once you’ve finished the interior of your book and have the final page count, go to the CreateSpace Template Generator and fill in all the required fields.
- Click on screenshots to enlarge.
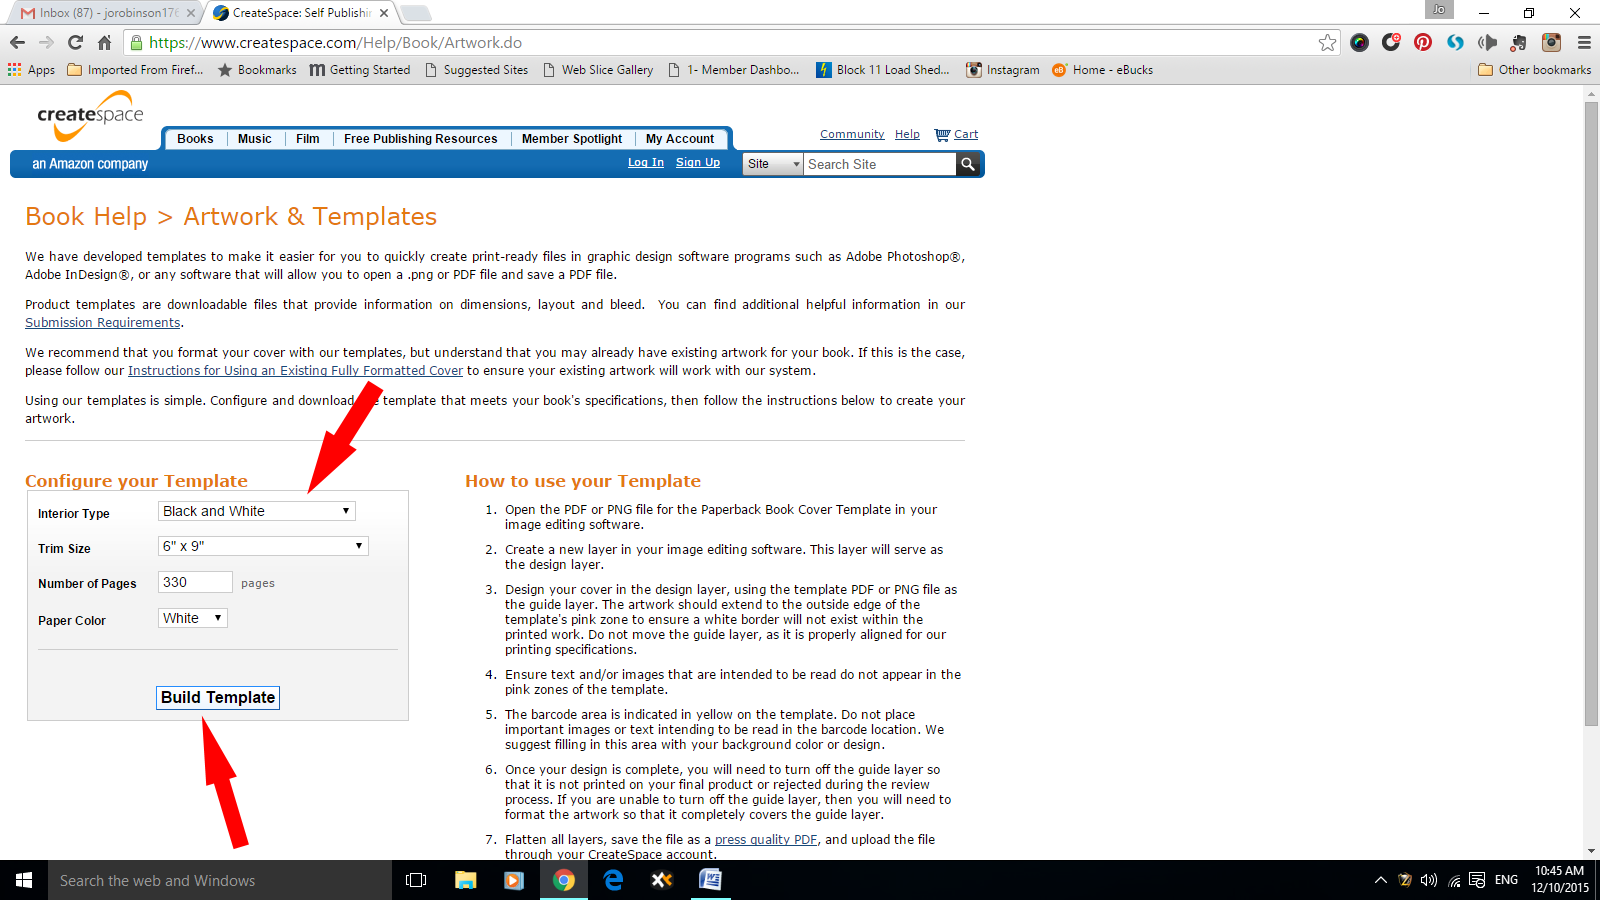
Click on Build Template and it will download a zipped file containing two templates. One PDF and one PNG. Drag the PNG across to the folder that you’ve allocated for all the elements of your cover design.
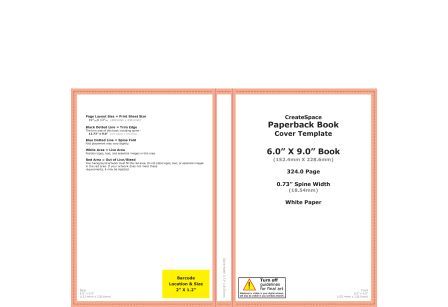
For some reason these templates come with a lot of white space around them – I suggest cropping it away to avoid straining your eyeballs overly. Another odd thing I’ve noticed with the templates is that the page counts written on them are generally rounded off. You can fiddle around with the generator until you get the exact count, although I just used the one I got. They know what they’re up to I’m sure.
You’re going to need to open this template with design software. You could use whatever you have such as Photoshop or Gimp – anything with layers. I’ll stick with my favourite for this sort of thing, my good old workhorse, the free Paint.NET. I’ve mentioned Paint.NET lots of times before so I won’t go into the whole thing again – just the steps you’ll need to take for this. If you don’t have any design software yet, go ahead and download this. As well as being free they have loads of plugins and tutorials on their site for you to get up to speed with it.
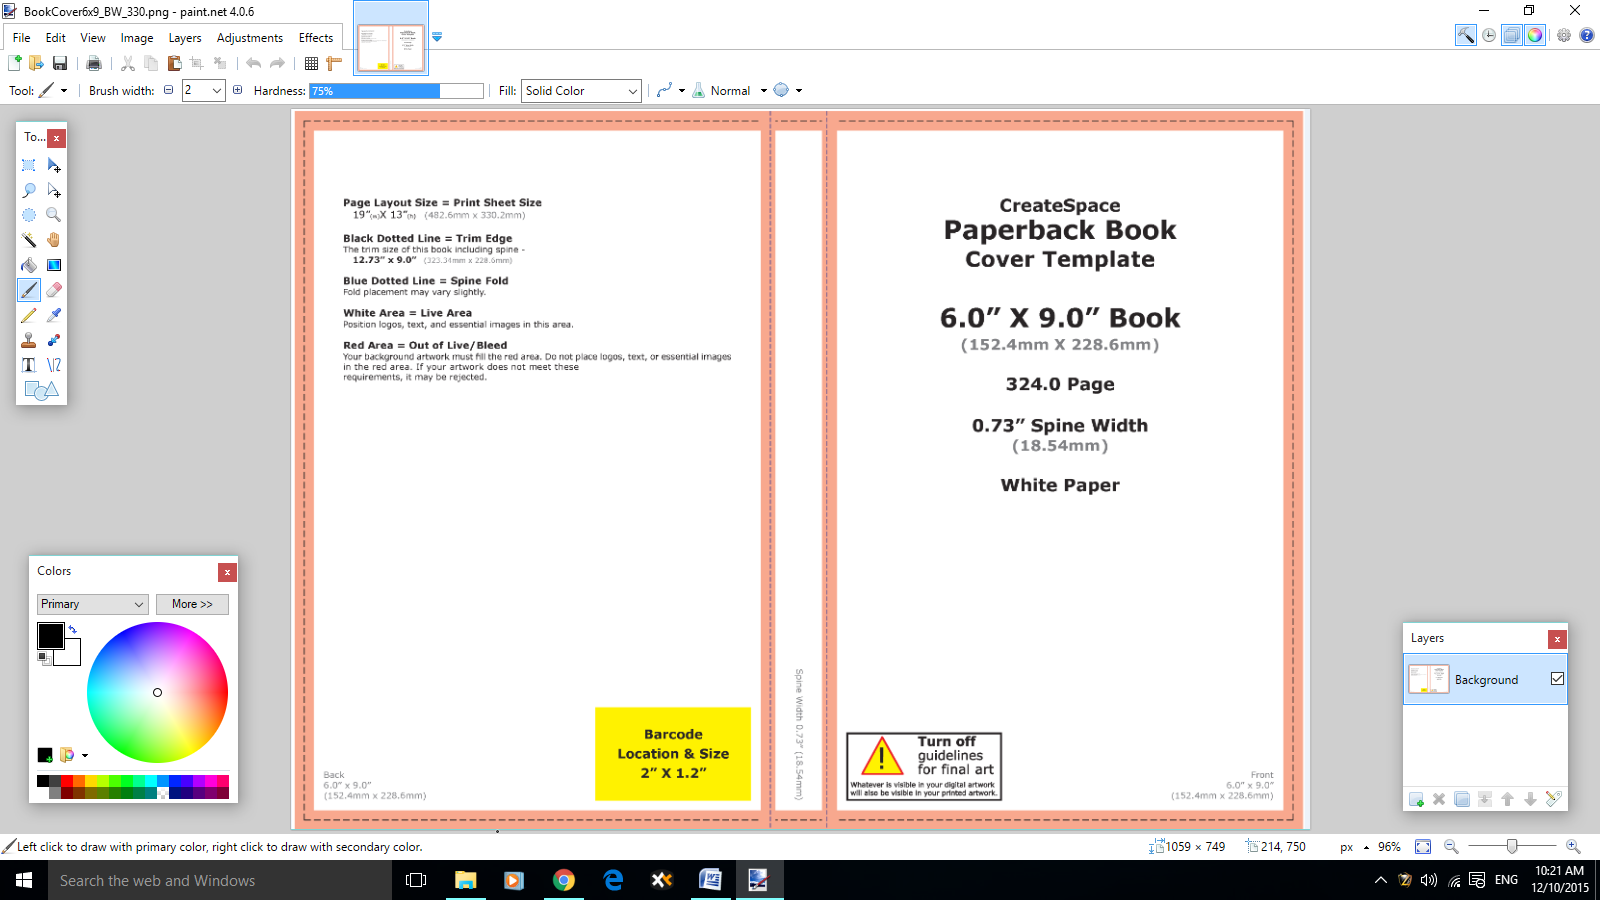 Before you load the template up – using File > Open on Paint.NET, double check that none of the elements of your cover are sized wider or higher than the template supplied. The original is 5700 x 3900 which becomes smaller after cropping. Also make sure that all images have a quality of 300dpi. You can check this in Paint.NET too by clicking on the Image tab and having a look at what comes up when you select Resize from the box there.The pink outer line (that I believe is referred to as the red line even though it’s all pink to me) is split by a dotted black line. Everything that you place below it is safe. Nothing must be placed above it that you’re going to mind losing in the trim process. Make sure that no typography creeps into any part of the pink as well as anything key to your design. Even though a portion of it may be trimmed away, it must still be filled to the very edge of all the pink. The black dotted lines running through the pink on the spine are your fold lines so make sure that your spine lettering or artwork is kept well away from them.
You can add elements in any order that you want. I just find it easier working from right to left. Click on the Layer tab in Paint.NET and select Import From File, browse for your cover and load it up.
Using the little tabs in the corners, stretch it out to fit or move it around by clicking on the image and moving it to where you want it. The easiest way that I’ve found is to get it lined up exactly in the top right hand corner and then stretching it out to fit.
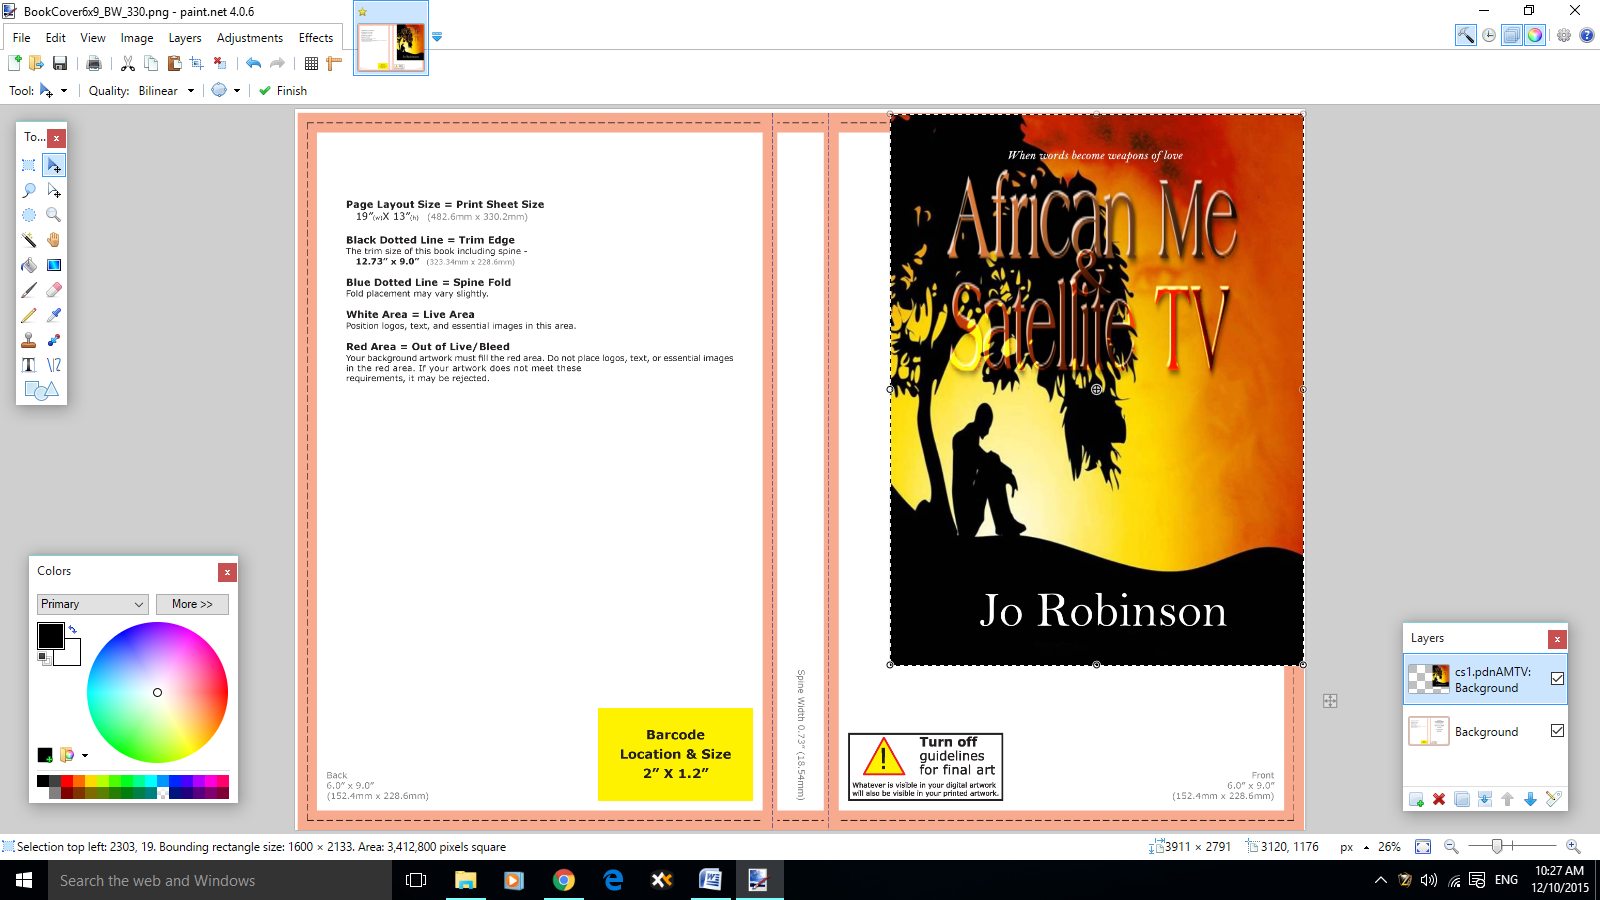
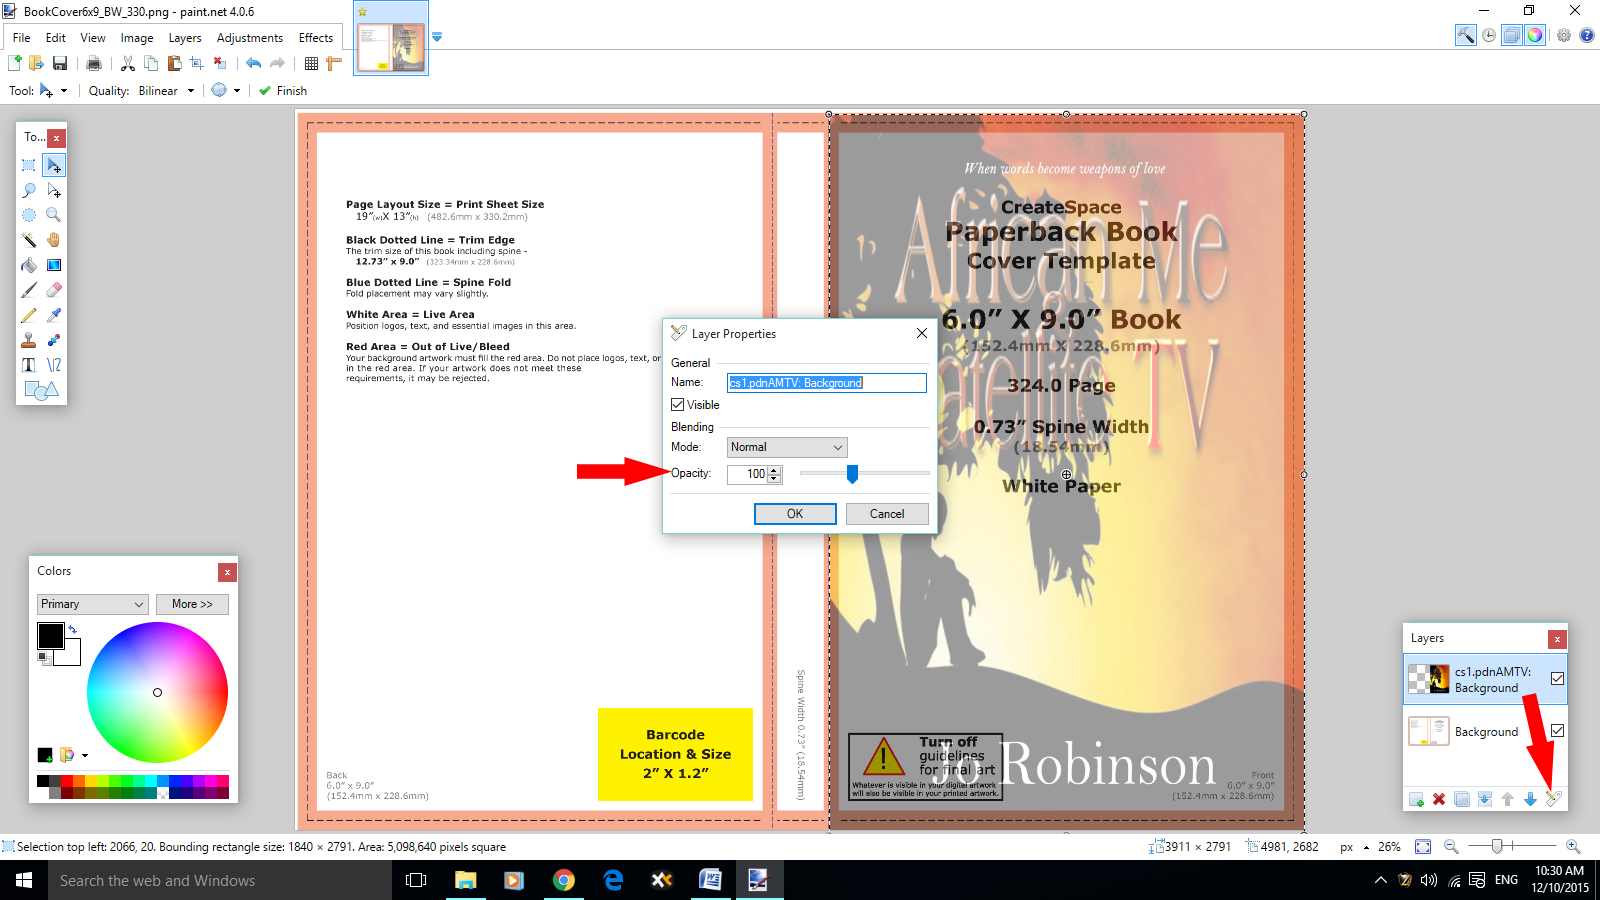
At any point in this process you can toggle between layers, but I purposely made this cover without doing so for anyone who finds the thought of fiddling with layers too much for now. The nicest and easiest trick to use is to change the opacity so that you can still see your cover, but you can also see through it to the template below. To make the layer you’re working on see-through click on the properties box in the bottom right hand corner of your screen and change it. Normal 100% opacity is set at 255, so try 100 to 150 to see the template too. Don’t forget to change it back to 255 when you’re done or you’re going to end up with the template being an actual part of your cover design.
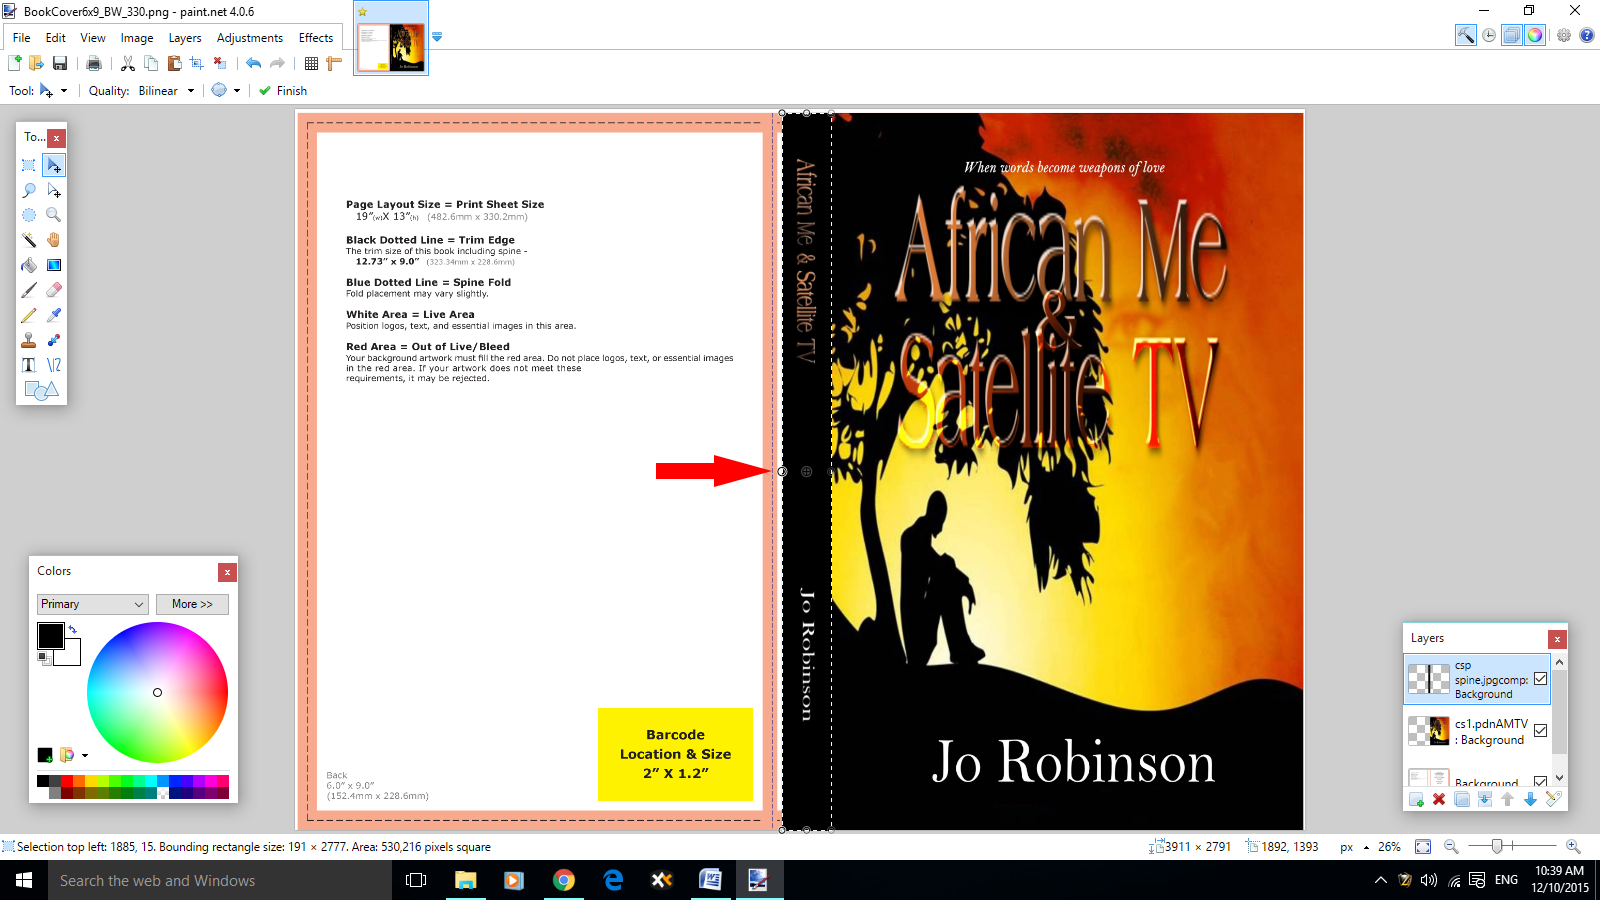
Next is the spine. Create yours facing the usual way, but rotate it to upright before loading it up.
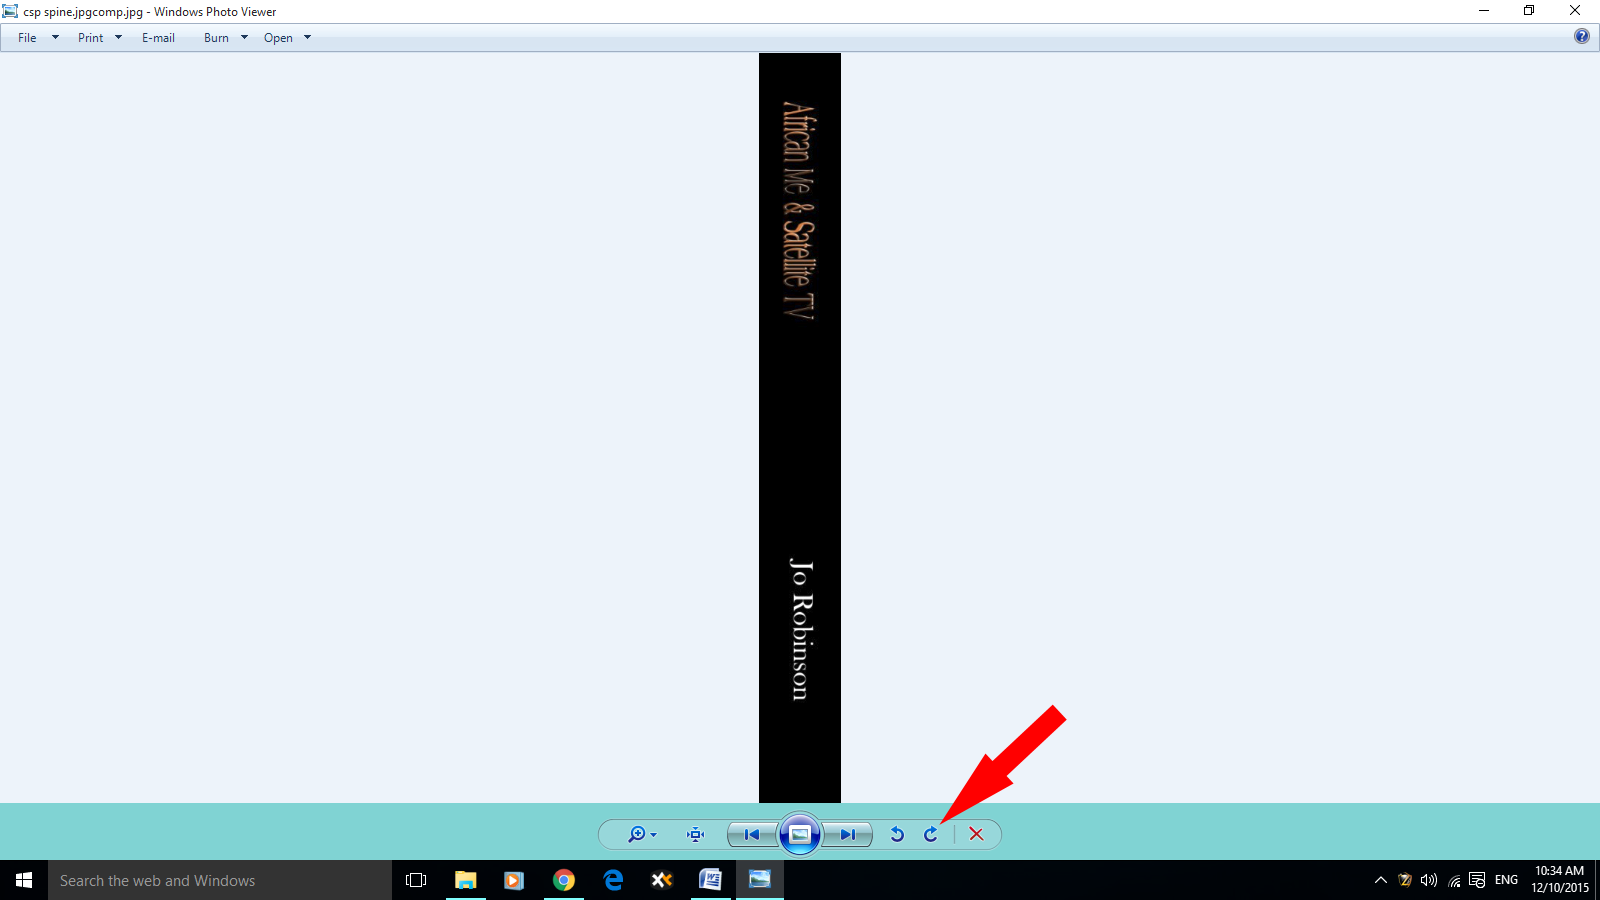
This way it will remain straight and all you have to do is stretch it out to the fold lines. Double check that there are no gaps left in between. Each time you use Import From File to add another element you are creating a new layer, so whatever you do there will have no effect on the layers below.
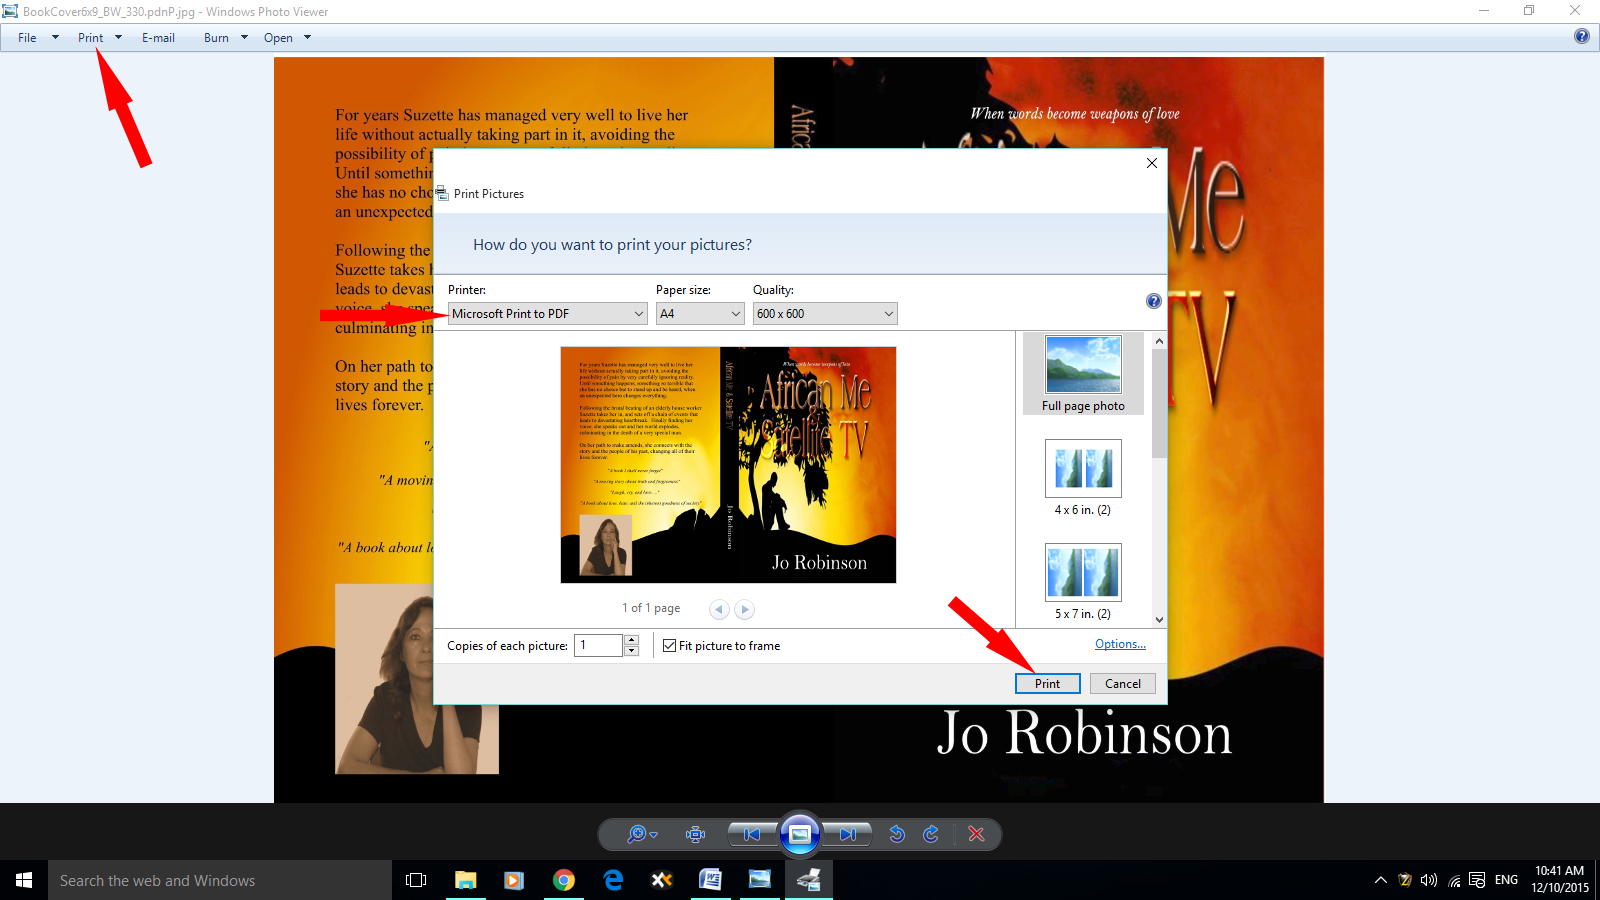
Finally add your back cover, making sure that there is nothing important in the barcode area or it will just get covered up, and Save As JPG. Open the JPG in your photo viewer and if you’re happy with it Print it as a PDF file. This will be what you’ll load up to CreateSpace. Job done.
If this seems like something you’re not ready to do, then definitely use the CreateSpace online cover creator. You should still load up your own cover design and back though rather than use theirs so as to not see your cover on other books all over the place. It’s easy to use and the only drawback I found with it was not having a greater selection of colours for the spines of books. Either way you decide to go, you can still end up with a fabulous cover for your book.

Reblogged this on Jo Robinson.
LikeLike
Reblogged this on Smorgasbord – Variety is the spice of life and commented:
Another essential read for Indie Authors who are using CreateSpace to publish their books.. How to make a PDF cover.. by Jo Robinson and can recommend her book which is a step by step guide to publishing your book on Amazon or CreateSpace http://www.amazon.com/Absolute-Indie-Beginners-Publishing-Amazon-ebook/dp/B014V3CEKA/ref=asap_bc?ie=UTF8
LikeLiked by 2 people
Thanks for sharing Sally! 🙂
LikeLike
Reblogged this on Chris The Story Reading Ape's Blog.
LikeLiked by 1 person
Thanks for sharing Chris! 😀
LikeLiked by 1 person
Always welcome Jo – a very informative article 😀
LikeLike
Reblogged this on Legends of Windemere and commented:
This always drives me nuts.
LikeLiked by 1 person
Thanks for sharing Charles! 🙂
LikeLike
Thanks so much. I’ve always been worried about bleeds, etc and have got somebody else to do it, but you make it sound pretty straight forward even for me. I might give it a go!
LikeLiked by 2 people
Thank you Olga! That’s what scared me too in the beginning but with the see through layers it makes it much easier. 🙂
LikeLike
This is fascinating with very clear and detailed descriptions. However dare I say scary looking! I have no idea if I could I ever do something like this but am bookmarking this just in case I need it later. At the moment I’m trying to work out how to get different fonts into WordPress and got as far as I think I need plugins. Something else to lean, – sigh!
LikeLiked by 1 person
It definitely gets a bit less scary as you zoom along the path Annika. 🙂 What an interesting idea! It would be great to have some nice fonts on WordPress – let us know if you win.
LikeLike
Hi Jo, thanks so much for this post. I’m currently trying to create a covers but the only problem is that Createspace doesn’t provide a template for an 8.5″ x 8.5″ book. Do you have any suggestions? Again thank you! 🙂
LikeLiked by 1 person
Pleasure Tracy! 🙂 I see that they have a 8.25 x 8.25 template on offer – would that work? What sort of book is it – that’s a nice big size.
LikeLike
Thanks for the reminder Jo (I’ve bookmarked it). I followed my nose through all the various upload processes at CS and B&N… but at this date, it’s been so long ago that I’ve no idea what I did. That makes the prospect of the next one a bit daunting.
Have a fabulous Friday. Hugs.
LikeLiked by 1 person
Thank you Teagan! 🙂 I also forget it all between books, so I have a step by step written down for every new paper book. If you ever need help just yell – it will be a pleasure. HUGS and a fabulous whole week to you.
LikeLike
Reblogged this on Writer's Treasure Chest and commented:
I found this excellent step-by-step guide on how to create a PDF cover for Createspace.. It has been written by Jo Robinson and I find it extremely helpful for first time self publishers.
LikeLiked by 1 person
Thanks for sharing Aurora Jean! 🙂
LikeLiked by 1 person
It was such a pleasure for me to do so! 🙂
LikeLike
Excellent information. I hope to be investigating this in more detail soon! Thanks, Jo! ❤
LikeLiked by 1 person
Pleasure Colleen! 🙂
LikeLiked by 1 person
Reblogged this on Silver Threading and commented:
HOW TO MAKE A PDF COVER FOR YOUR CREATESPACE BOOK, by Jo Robinson! Great information! ❤
LikeLiked by 1 person
Thanks for sharing Colleen! 🙂
LikeLiked by 1 person
I really love these tutorials! 💗
LikeLike
Reblogged this on Rebirth of Lisa.
LikeLiked by 1 person
Thanks for sharing Lisa! 🙂
LikeLiked by 1 person
Reblogged this on The Way of the Storyteller:.
LikeLike
Reblogged this on Phoenix Rainez and commented:
If you aren’t already following Jo Robinson, suggest you take a look at her blog. Many helpful ideas for self published authors.
LikeLike
Thanks for sharing Jo. Have reblogged.
LikeLike
Reblogged this on J. M. Payer and commented:
Great cover info for writers interested in doing it themselves!
LikeLike