I’m working on a couple of projects that require lined pages for interactive paper books for CreateSpace publishing. Note that I’m not suggesting this method for Kindle books, mainly because I haven’t tried it there yet, and fancy formatting is not a good idea at all for Mobi, but also because a lined eBook isn’t going to do anyone much good. For eBook workbooks, I’d suggest rather including a printable, downloadable PDF workbook in your Kindle book—but we’ll do that another time.
If you want to create a journal or workbook, you’re going to want lined pages, or pages with text, images, and also lines. You could probably just hit the underscore a whole lot of times but that could run into problems, and using Word’s formatting tricks works well with CreateSpace. This way you control the look of your pages very nicely. Here we go.
The first thing to do is to set up your paper size.
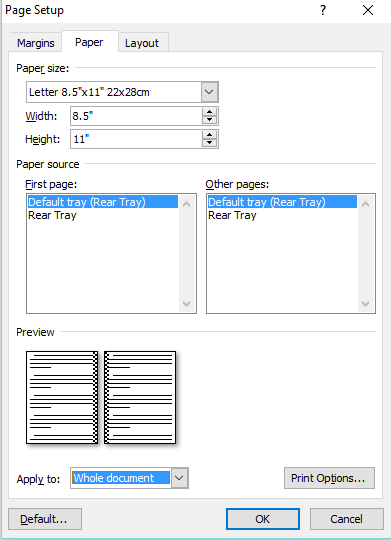
And margins.

I’m using a large size here, 8.5 x 11 inches, but obviously you would set your own book size and margins accordingly. The next step is to decide how long you want your lines to be. If you want them the width of the page, then simply subtract your gutter, left and right margin sizes from the width of the book. Once you have your book size, it’s easy to decide on the length of line you want—play around with it awhile before saving.
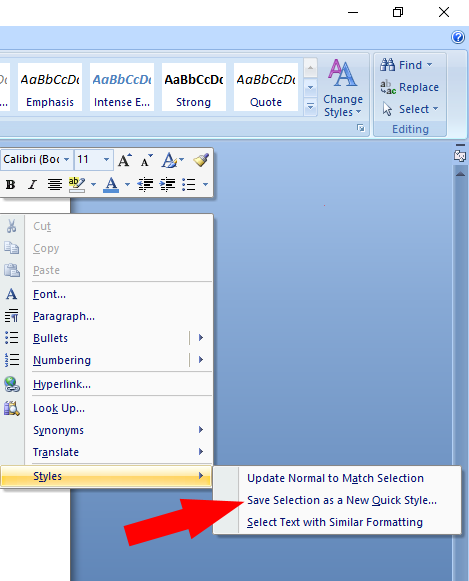
Next, place your cursor where you want your first line to appear, and toggle the Show/Hide (pilcrow) function on. Highlight the pilcrow that appears on the page. Click on the arrow beneath the Change Styles box and select Clear all, to clear the formatting on it.

Click on the arrow in the Paragraph box from your home tab, and then click on the Tab box at the bottom of the box that pops up. In the Tab stop position box, type in the number that you get after deducting your margins. Select Right alignment, and select 4 in the Leader box (this is for underline). Click Set and OK.

Now go back to your pilcrow and hit the tab key. Your line will now zoom across the page. Right click on the pilcrow and select Save Selection as New Quick Style.
Type in the name of your choice and click OK. To use the lines in this manuscript now, all you have to do is select it from the Change Styles box, and click Tab and Enter.
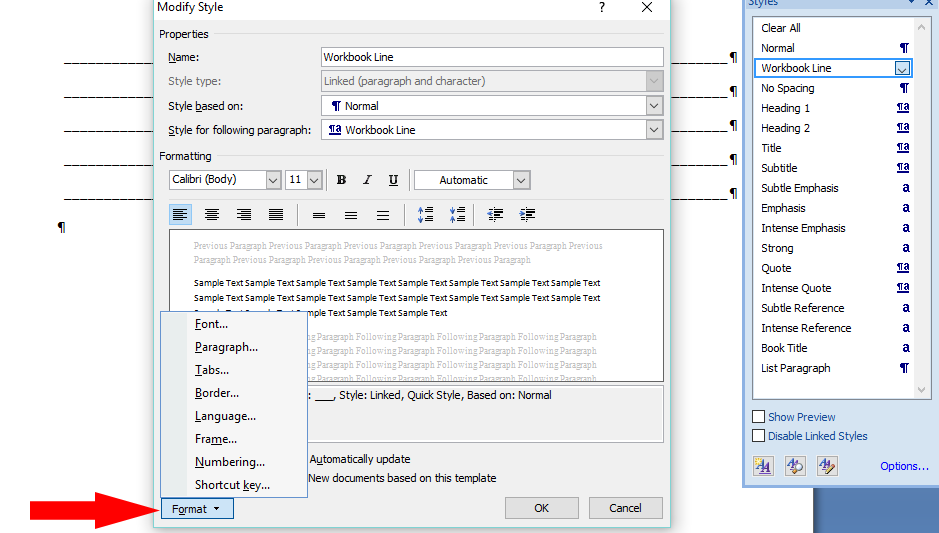
To format your lines, open the Change Styles box and click on the little arrow that appears when you hold your cursor over your newly created style. Select Modify and then Format, and then change the Paragraph line spacing as you wish.

Right click on the pilcrow to change the line colour. Unclick the Show/Hide pilcrow to get back to working normally.
Remember that if you change your margins at a later time, you will have to format your lines again, but for this particular book, you’re ready to go, and don’t have to abuse the underscore key or get your head around tables.
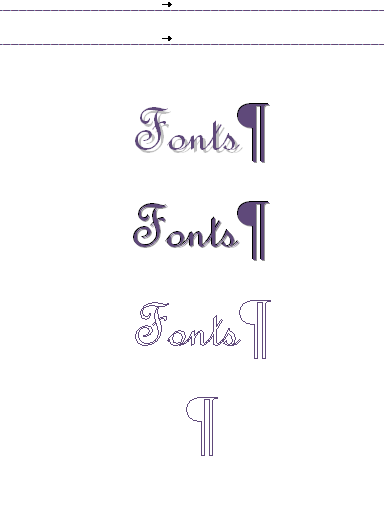
Lastly, while we’re on the subject of journals and workbooks, you might want to explore your font horizons on Word for some really pretty or striking effects. Click on the arrow in the Font box from your home page and play around with all the effects and options available for each font. Happy creating fellow scribblers.


Reblogged this on Jo Robinson.
LikeLike
I appreciate seeing this. Thank you, Jo!
LikeLiked by 1 person
Thanks to you Annette! Hopefully we’ll see some fabulous Angel journals. 🙂
LikeLiked by 1 person
Oooh… yes! 🙂
LikeLiked by 1 person
I’ll definitely buy one – love your angel messages. 🙂
LikeLiked by 1 person
Gosh, thank you for saying so. ❤
LikeLiked by 1 person
❤
LikeLiked by 1 person
Reblogged this on Chris The Story Reading Ape's Blog.
LikeLiked by 1 person
Thanks for sharing Chris! 😀
LikeLiked by 1 person
Welcome Jo XXX
LikeLiked by 1 person
This is better than using tables, which I used long, long time ago. Thanks, Jo. 🙂
LikeLiked by 1 person
Thank you Tess! The tables are definitely a bit of a schlep. This way, if all your workbooks or journals are the same size, you’re good to go every time. 🙂
LikeLiked by 1 person
Reblogged this on Smorgasbord – Variety is the spice of life and commented:
Jo Robinson is over on Lit World Interviews today with a very helpful, step by step guide to create lines in interactive books..Take advantage of her expertise and Jo offers author services so if you need some help or work completed then she is one of my personally recommended people to go to.
LikeLiked by 1 person
Thank you for sharing lovely Sally, and for the wonderful support! ❤
LikeLiked by 1 person
♥♥♥
LikeLiked by 1 person
Wow. I would never have figured that out, ever. This too shall be tucked away for future use. Can’t wait to hear about what you’re working on 🙂
LikeLike
Reblogged this on Don Massenzio's Blog.
LikeLike