It’s a good idea to find out how to publish your first eBook on Amazon before, or while you’re writing it. Simplicity is the key, and if you have too many bells and whistles going on formatting wise, you might end up having to clear all formatting and start from scratch. If you use a word processor other than Microsoft Word you might have to pay for formatting, but using Word makes the process very easy. Here’s a quick overview for a standard work of fiction without images. (Click on the screenshots to view them larger)
Don’t use lots of spaces or your tab key for indents. This could result in an ebook that’s a bit of an oops. Rather set up the whole document. You can do this from your first paragraph, or you can highlight the whole document and set it up. Do this from a clean document only after you’ve removed any indents, spaces and so on. Use the Show Hide feature to check.

Go to your Page Layout tab in the top ribbon of your document, and then click on the little arrow to the right of the Paragraph selection. Select Indents and Spacing and change Special to First Line, and then change By to your preferred size of paragraph indent, and that will do your indents automatically for the entire manuscript from then on.

Then, in the same box, set your automatic spacing between paragraphs, so set your Spacing to your desired size, and set line spacing to Single.

While writing, insert Page Breaks before each chapter and don’t use headers and footers. Also no page numbers for your eBook. Kindle only uses seven basic fonts, and readers can change them according to their preference. They can also change the font size, so 12pt is probably the easiest size to choose. It’s best to use a simple font like Times New Roman or Garamond, but that’s entirely up to you.
Then you decide if you want a table of contents for your book. If you do, from your Home ribbon, highlight your first chapter heading, and then click Heading 1. You can right click on the Heading 1 box to Modify Font, Size, and Justification for your chapter headings. Once you’ve modified to what you prefer, right click on the Heading 1 box again and click on Update Heading 1 to Match Selection. Then zoom through your book and highlight each chapter heading, click on Heading 1, and they’ll all be the same.

Once you’ve done that head back to the front of your book where you’ll need a blank page. Type the words Table of Contents using left alignment, and press enter. Click on the References tab in your top ribbon, then Table of Contents > Insert Table of Contents. Uncheck Show Page Numbers, and set the Show Levels box to 1. Click OK, and voila! Your Table of Contents will magically appear. To test it, use Control > click over one of the chapters in your TOC and it should take you there.

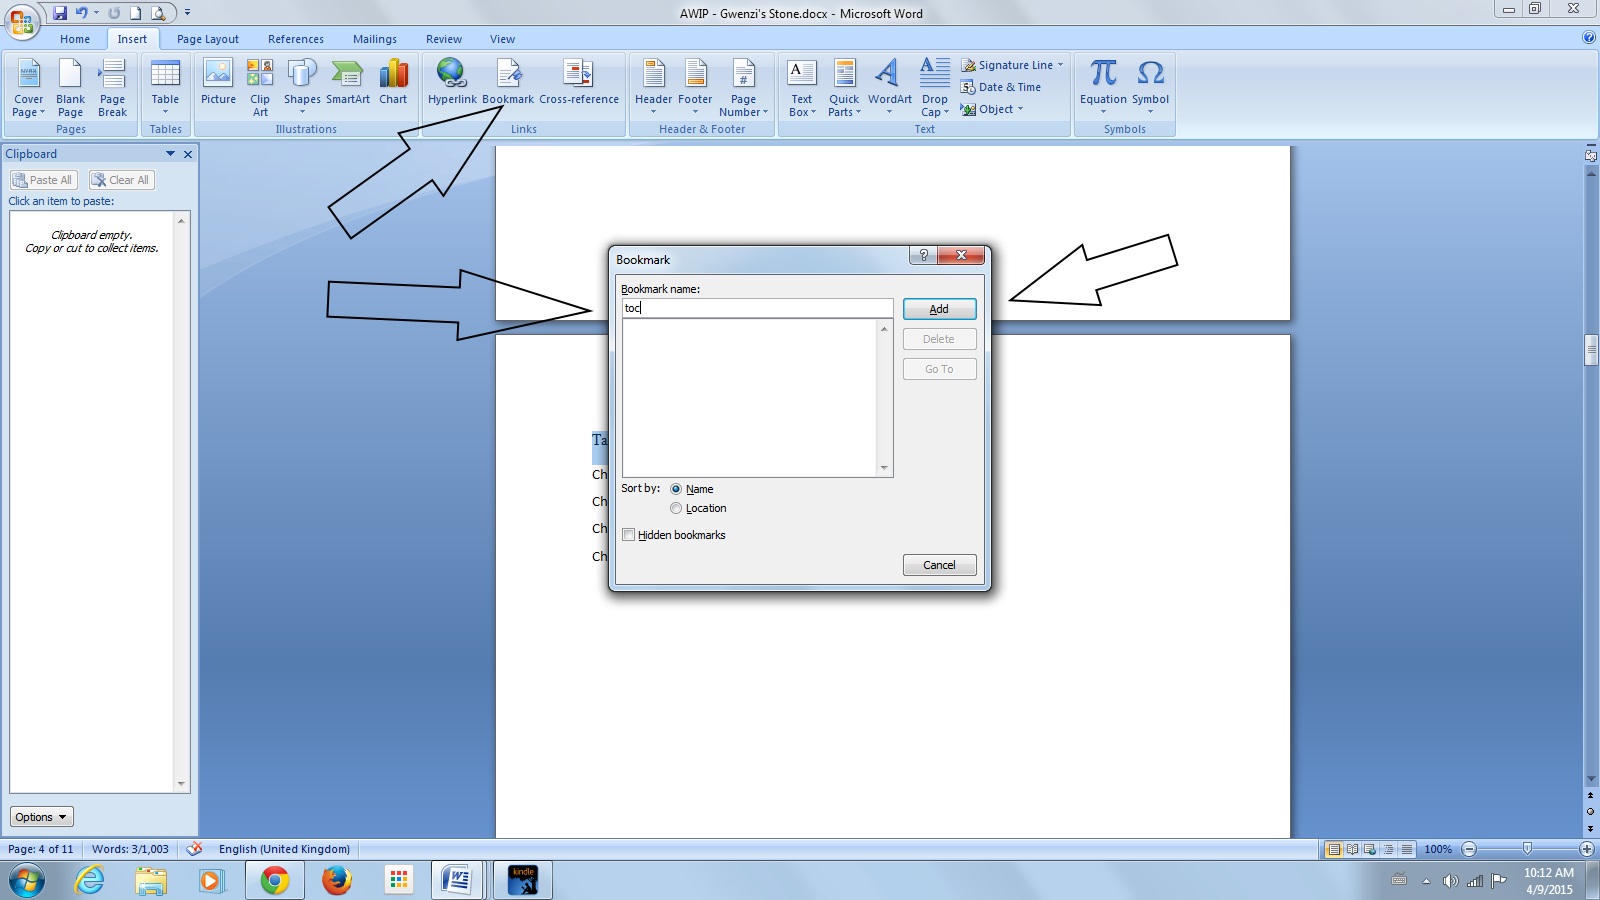
Now to bookmark this. Highlight only the words Table of Contents. Select Bookmark from the insert tab on your top ribbon. Type in toc and click Add in the box that pops open, and you’re done with the fiddly stuff.
Assuming you’re done with your final proofing and edits, go over your manuscript, and check that your front matter is looking good. Insert page breaks between your title page, copyright page, and any other things you have there, such as a forward, prologue, dedication, or editorial reviews. One thing I haven’t done yet in all my eBooks is add a description in the front, although I’m going to. These days we have so many books on our Kindles that we forget what they were about, so a little blurb there is a nice idea.
Then check that all your links to your website or any other books are clickable, finally Save this document, and prepare for takeoff. After saving all your hard work, go to the Save As function in the top left corner and select Other Formats. Next, under the File Name select Web Page, Filtered in the Save As Type box. Click yes when the warning comes up. You’ll see that you now have your original document, and also a HTML document of the same name. The HTML is what you’ll be loading on to Amazon. (If you have images in your book, you will need to load a compressed file onto Amazon, so this is only for manuscripts without them)

Have your cover ready separately as a jpeg or tiff image. I use nice quality high resolution images sized at 6.25 x 9.5. You’re ready to rock.
If you haven’t already, open your account at Amazon KDP, and fill everything in. If you don’t live in the USA you have a couple of tax options, including allowing Amazon to withhold tax until you get around to getting to the proper processes. You can still publish and earn royalties until you do, and any withheld taxes will be paid to you when the necessaries are done.
Go to your Bookshelf. Click on Add New Titles, and take your time filling in all the fields. Especially don’t rush through the Categories and Tags. These are important for your book’s visibility. Select your Royalty. This can change for each book you publish. Books $2.99 and up get 70%, and below that get 35%. Put your book blurb in Description, add yourself as the author in Contributors (and any other contributors that should be there), state your right to Copyright and not Public Domain, and now it’s time to upload.
Your book file and cover file get loaded separately, both very simple processes – you just upload straight from your computer, and wait to be told that each upload is successful. Click on Upload Book, browse, and select the HTML document to upload. As soon as you see Upload and Conversion Successful, you get various options to review. I always download the Mobi file to go through on my Kindle for PC, and also to check on my actual Kindle, as well as paging through the online reviewer. Once you’re happy, click Save and Publish. Your book will then be live on Amazon within the next 48 hours. Set up your Amazon Central page, and find and claim your book.
When you write your next book, you can make a copy of the formatted one, delete the words and retain the formatting, which is a thing that scribblers as forgetful as I am might find useful. Happy publishing Indies.
UPDATE: SEE OUR LATEST ON HOW TO Create NCX Table of Contents using Calibre

Reblogged this on Jo Robinson.
LikeLike
Great suggestion about the description/blurb in the front of e-books.
Hugs!
LikeLiked by 1 person
Reblogged this on The Writing Chimp and commented:
Nice article, step by step guide to publishing your first book on Amazon 🙂
LikeLike
Reblogged this on Smorgasbord – Variety is the spice of life and commented:
Jo Robinson on fire today with an excellent illustrated tutorial on how to format your book for Kindle.
LikeLike
Reblogged this on Chris The Story Reading Ape's Blog and commented:
More great advice from Jo 😀
LikeLike
Reblogged this on The Last Wave: An NDE, Ebook and commented:
Here are directions for setting up your first ebook to publish on amazon, in a nutshell! There are a few details like the ‘show and hide’ feature that I didn’t know about and will help immensely when trying to figure out the indents and if the margins look good. It’s amazing how much it sometimes takes to get a story written and that is a big moment and a celebration, but it’s not the end of being an author, unless one plans on shelving the story, in lieu of that, with all the self-publishing options now available, a person really can publish their own book. With this realization comes the next part: learning the ‘how’ to self-publish, which means also learning to do things like formatting an ebook.
It took me two years to get that right on the ‘The Last Wave’. At first, I didn’t realize that it was totally unreadable on the kindle, until I got my first review. I unpublished it and spent another year working on it, determined to fix it, which meant, for me, a new computer. It then took another year working on the proofreading and editing. Even with all that, I still had to hire a professional editor.
It takes time to get your book right, but it is worth it, since you wrote it in the first place. Go forward writer’s knowing that time is all we really have have here on Earth, so go for it. it’s OK to take it all step by step, that is how you will get to where ever you are going and maybe you too will one day have a published ebook, then two, then three….! Thanks, Jo Robinson!
LikeLike
Reblogged this on "Midnight Press".
LikeLike
Very clear and to the point, Jo. I did download and have a paper copy of this free booklet, but there’s plenty in it I’ve never used.
Thanks for the reminders Jo!
LikeLike
I get my novels published via a traditional publisher, but I have played with the idea of shaping my 364 Blog Posts into a book which I would publish myself, and this advice would be very useful, so thank you 🙂
LikeLike
What are the pros and cons for self-publishing our e-books on Amazon versus somewhere else?
LikeLike
Reblogged this on Kentucky Mountain Girl News and commented:
KMGN: Excellent! Thanks to The Story Reading Ape for more superb information and @JoRobinson76 for giving said information!
LikeLike
This warms my Word-loving heart. If you’re not using styles in your document, you’re torturing yourself. A few minutes of work learning how to use them up front will save you hours down the road of playing “format the mess.” If you want a nice template for your book, drop me a line and I’ll email one free of charge which contains nice fonts and styles and stuff, along with a description of what to do and where to go in an emergency. No, wait, not that, but how to use the styles in the document. Show/Hide is pretty important– you might not like the look of the little marks, but it’s pretty important to eliminate extra line breaks/page breaks and slay every single tab, ever, in your document.
LikeLike
Thank you so much for sharing this, I’ve saved it so I can refer back to it when it comes time to format my first novel. Invaluable tips thank you. 🙂
LikeLike
Great article, Jo!! Pinned to my Author Tutorial board!! Hugs!
LikeLike
Thanks, Jo, excellent article. I published my first book with Lulu publishing but I want to try Amazon with my second book. Hopefully, with your post to guide me, I won’t mess up too badly 🙂
LikeLike
Thanks, Jo, for this thorough and helpful inforation. 🙂
LikeLike
This is really useful! I wouldn’t even know where to begin.
LikeLike
I needed this right now – your timing is amazing! Thank you, Jo 🙂
LikeLike
So nice of you to post this step-by-step approach. I paid a friend (who’s good with this kind of thing) to format for me. My brain just doesn’t compute all of this, and it turns me off the idea of self-publishing. Fortunately, my friend did a great job. 🙂
LikeLike
Thanks for this great information that I needed right now! It’s like you read my mind. ❤
LikeLike
Reblogged this on B. Shaun Smith.
LikeLike
Thank you Jo…I bookmarked this when I started the final go-through of my new book as I had elected to go with Kindle on my own (no vanity press this time). Nicely explained for a low-tech guy like me!
LikeLike